> ## Documentation Index
> Fetch the complete documentation index at: https://docs.tracectrl.ai/llms.txt
> Use this file to discover all available pages before exploring further.
# Prerequisites
> System requirements, software, and API keys to set up before the TraceCtrl bootcamp. Complete this before the session.
**Complete this before the bootcamp.** Run the verification script at the bottom and confirm all green before arriving.
***
## System Requirements
### Hardware
| Resource | Minimum | Recommended |
| ------------- | ---------------------------------------------- | ----------- |
| **RAM** | 8 GB | 16 GB |
| **CPU** | 2 cores | 4 cores |
| **Free Disk** | 5 GB | 10 GB |
| **OS** | macOS 12+, Ubuntu 20.04+, Windows 10/11 (WSL2) | |
The four Docker containers each have different resource profiles:
| Container | Image Size | Runtime RAM | Role |
| ------------------ | --------------------- | ------------------------- | ----------------------------------------------------------------------------- |
| `clickhouse` | 805 MB | 2–4 GB | Column-oriented database — buffers data in memory for fast analytical queries |
| `otel-collector` | 328 MB | 128–256 MB | Receives, batches, and forwards OpenTelemetry spans |
| `tracectrl-engine` | 226 MB | 256–512 MB | FastAPI app running the TAGAAI analysis pipeline |
| `tracectrl-ui` | 63 MB | 64–128 MB | Static React dashboard served by nginx |
| **Total** | **\~1.4 GB download** | **\~2.5–5 GB at runtime** | Plus Docker overhead and host OS |
ClickHouse is the dominant cost — it is a production-grade OLAP database designed to hold millions of spans in memory for fast queries. On an 8 GB machine you have roughly 3–4 GB headroom after the full stack is running, which is sufficient for the workshop.
**Docker/Rancher memory cap.** Docker Desktop and Rancher Desktop default to a 4–6 GB memory limit for the Linux VM. ClickHouse may OOM-kill if that cap is too low.
Go to **Settings → Resources → Memory** and set it to at least **6 GB** before starting the stack.
***
## Software Prerequisites
### 1. Container Runtime
Pick the runtime that fits your machine and your organisation's licensing policies. **Docker Desktop** is the simplest path on macOS / Windows if your org permits it. **Rancher Desktop** is a free open-source alternative if Docker Desktop's subscription terms don't fit (e.g., large enterprises on the paid tier). **Docker Engine** is for Linux servers and WSL2. All three work with TraceCtrl — `tracectrl setup` detects which is installed automatically.
Simplest setup. Requires a paid subscription for large organisations — check your company's policy first.
```bash theme={"dark"}
# macOS — Homebrew
brew install --cask docker
# Open Docker.app from /Applications after installing.
```
Or download directly from [docker.com/products/docker-desktop](https://www.docker.com/products/docker-desktop/).
After installing, go to **Settings → Resources → Memory** and set it to at least **6 GB**.
```bash theme={"dark"}
# Verify
docker --version && docker compose version
```
Free and open-source. Use this when Docker Desktop's licensing doesn't fit your organisation.
1. Download and install Rancher Desktop from [rancherdesktop.io](https://rancherdesktop.io)
2. On first launch, choose **Container Engine: dockerd (moby)** — this gives you the standard `docker` and `docker compose` CLI
3. Under **Kubernetes**, you can disable it (not needed for TraceCtrl)
4. Go to **Settings → Resources → Memory** and set it to at least **6 GB**
```bash theme={"dark"}
# Verify
docker --version && docker compose version
```
If your Rancher Desktop is already configured with the **containerd** engine, use `nerdctl compose` in place of `docker compose` everywhere in the bootcamp. `tracectrl setup` detects this automatically and uses `nerdctl` if `docker` is not found.
```bash theme={"dark"}
# Ubuntu / Debian / WSL2
sudo apt-get update
sudo apt-get install ca-certificates curl gnupg -y
sudo install -m 0755 -d /etc/apt/keyrings
curl -fsSL https://download.docker.com/linux/ubuntu/gpg | \
sudo gpg --dearmor -o /etc/apt/keyrings/docker.gpg
echo "deb [arch=$(dpkg --print-architecture) signed-by=/etc/apt/keyrings/docker.gpg] \
https://download.docker.com/linux/ubuntu \
$(. /etc/os-release && echo "$VERSION_CODENAME") stable" | \
sudo tee /etc/apt/sources.list.d/docker.list > /dev/null
sudo apt-get update
sudo apt-get install docker-ce docker-ce-cli containerd.io \
docker-buildx-plugin docker-compose-plugin -y
sudo usermod -aG docker $USER && newgrp docker
```
```bash theme={"dark"}
# Amazon Linux 2023 (EC2)
sudo dnf install docker -y
sudo systemctl enable --now docker
sudo usermod -aG docker $USER && newgrp docker
```
```bash theme={"dark"}
# Verify
docker --version && docker compose version
```
Expected output:
```
Docker version 27.x.x
Docker Compose version v2.x.x
```
**macOS — daemon not running:** `Cannot connect to the Docker daemon` means Rancher Desktop or Docker Desktop is installed but not started. Open it from Applications and wait for the icon to turn green/active.
**Linux — permission denied on socket:** Run `newgrp docker` or log out and back in after adding yourself to the docker group.
***
### 2. Python 3.10+
```bash theme={"dark"}
brew install python@3.12
# Add to PATH if brew warns:
echo 'export PATH="$(brew --prefix python@3.12)/bin:$PATH"' >> ~/.zshrc
source ~/.zshrc
```
```bash theme={"dark"}
sudo apt update && sudo apt install python3 python3-pip python3-venv -y
```
```bash theme={"dark"}
sudo dnf install python3.12 python3.12-pip -y
```
**Verify:** `python3 --version` → `Python 3.10.x` or higher
***
### 3. Git
```bash theme={"dark"}
brew install git
```
```bash theme={"dark"}
sudo apt update && sudo apt install git -y
```
```bash theme={"dark"}
sudo dnf install git -y
```
**Verify:** `git --version` → `git version 2.x.x`
***
### 4. Bootcamp Examples Repo
Two pre-built, pre-instrumented Strands examples that the workshop uses. Clone now so the first run doesn't have to download anything.
```bash theme={"dark"}
git clone https://github.com/tracectrl/tracectrl-bootcamp-examples.git
cd tracectrl-bootcamp-examples
```
You should see two example folders:
```bash theme={"dark"}
ls
# README.md research_workflow_example teacher_assistants_workflow_example
```
Each folder is self-contained — its own README, `.env.example`, runner scripts (`run_agents_workflow.sh` for pip, `run_agents_workflow_uv.sh` for [uv](https://docs.astral.sh/uv/getting-started/installation/)), and Python files. **Don't `cp .env.example .env` yet** — you'll do that during the workshop once you've decided which auth path you're using.
The first time you run a `run_*.sh` script, it creates a venv and installs `strands-agents[gemini]`, `strands-agents-tools`, `tracectrl`, and `tracectrl-instrumentation-strands` from PyPI. About a minute on pip, a few seconds on uv. **Run the script once before the session** to prime the venv — even if you don't have an API key yet, the install will succeed and only the final agent call will fail. That gets the slow part out of the way over your home WiFi.
***
## API Key: Google AI Studio
The bootcamp organizer provides a shared **Google AI Studio API key** via a single Bitwarden Send link. You'll need a **passphrase** to unlock it — the facilitator will share that on the day of the bootcamp.
Open Bitwarden Send → enter the passphrase (given in person on the day) → click the copy icon → paste straight into the `GOOGLE_API_KEY=` line of each example's `.env`.
Don't paste the key into chat, slides, screenshots, or any file other than `.env`. The link expires and the key is rotated immediately after the bootcamp ends.
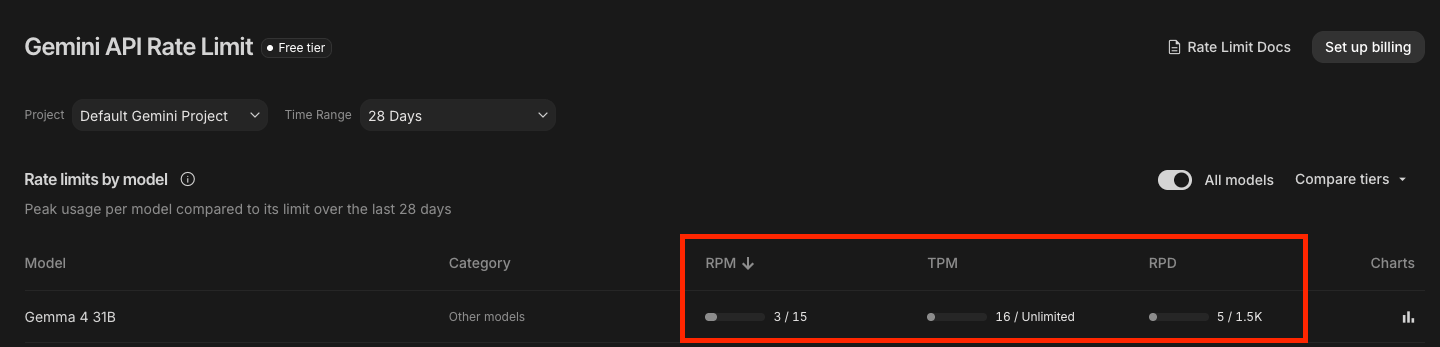
If for any reason you can't access the link, AI Studio's **free tier** is more than enough for the workshop — create your own key by following the same steps below. No billing setup is required either way.
| Limit | Value |
| ------------------------- | --------- |
| Requests per minute (RPM) | 15 |
| Tokens per minute (TPM) | Unlimited |
| Requests per day (RPD) | 1,500 |
These limits are sufficient for the bootcamp. View your own limits anytime under **Rate Limit** in the AI Studio sidebar.
 ### Step 1 — Create the Key
1. Go to [aistudio.google.com](https://aistudio.google.com) and sign in with any Google account
2. Click **Get API key** in the left sidebar (or **API Keys** if already signed in)
3. Click **Create API key** (top right)
4. Select or accept the **Default Gemini Project**
5. Your key appears in the list. Click the **copy icon** (highlighted below) to copy it to your clipboard
### Step 1 — Create the Key
1. Go to [aistudio.google.com](https://aistudio.google.com) and sign in with any Google account
2. Click **Get API key** in the left sidebar (or **API Keys** if already signed in)
3. Click **Create API key** (top right)
4. Select or accept the **Default Gemini Project**
5. Your key appears in the list. Click the **copy icon** (highlighted below) to copy it to your clipboard
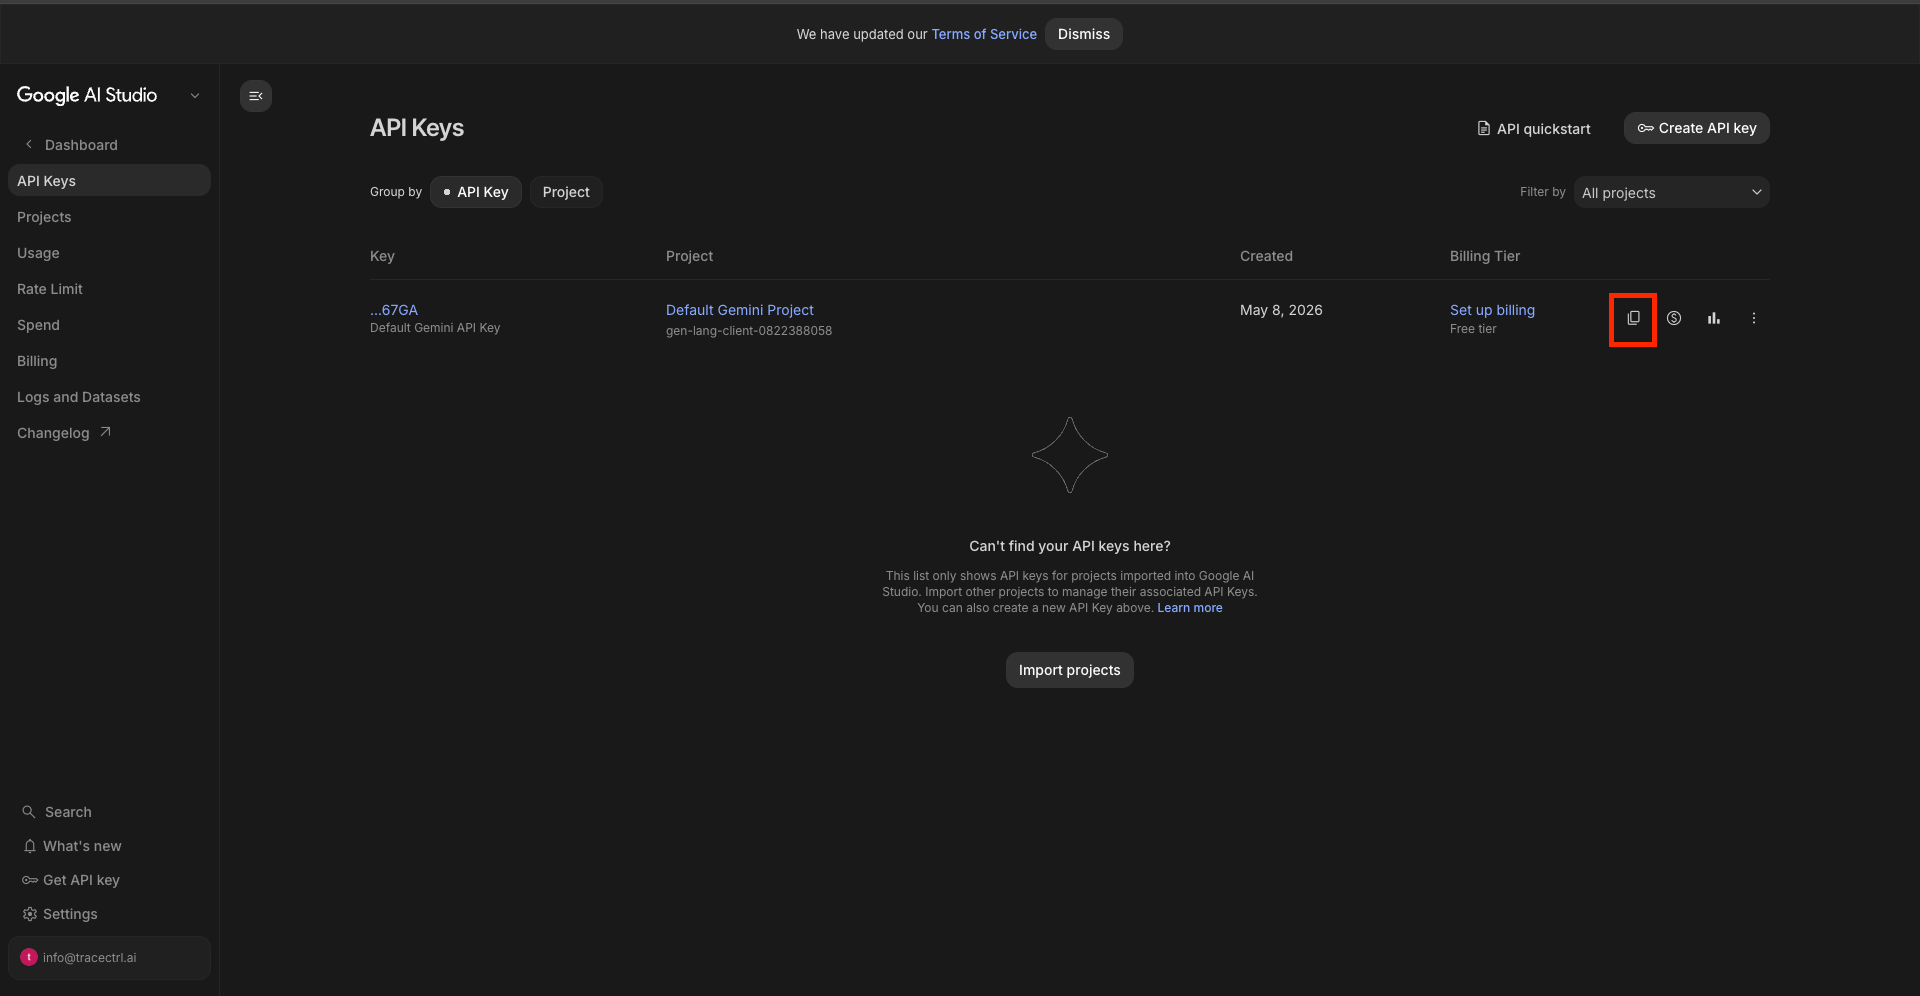 The key starts with `AIza...`. The **Billing Tier** column shows **Free tier** — no payment is needed for the bootcamp.
### Step 2 — Test the Key
Paste this into your terminal (replace `YOUR_API_KEY_HERE`):
```bash theme={"dark"}
curl "https://generativelanguage.googleapis.com/v1beta/models/gemini-3.1-flash-lite-preview:generateContent" \
-H 'Content-Type: application/json' \
-H 'X-goog-api-key: YOUR_API_KEY_HERE' \
-X POST \
-d '{
"contents": [
{
"parts": [
{
"text": "What tools do you have access to?"
}
]
}
]
}'
```
Expected: a JSON response containing `candidates[0].content.parts[0].text`. If you see a `400` or `403` error, the key was not copied correctly — return to AI Studio and copy it again.
**Never commit your API key to git.** Always use environment variables — never paste the key directly into code files.
***
## Configure the Example `.env` Files
Each bootcamp example reads its config from a local `.env` file. Set them up once now — the workshop step is then just "run the script". Do this for **both** examples even if you only intend to run one; it costs nothing and saves time on the day.
```bash theme={"dark"}
cd tracectrl-bootcamp-examples
cp research_workflow_example/.env.example research_workflow_example/.env
cp teacher_assistants_workflow_example/.env.example teacher_assistants_workflow_example/.env
```
Open each `.env` and paste your `AIza...` Google AI Studio key into `GOOGLE_API_KEY`:
```env theme={"dark"}
GOOGLE_API_KEY=AIzaSy...your_key_here
GOOGLE_MODEL_ID=gemini-3.1-flash-lite
TRACECTRL_ENDPOINT=http://localhost:4317
TRACECTRL_SERVICE_NAME=agents-workflow
TRACECTRL_ENVIRONMENT=demo
```
Leave the `TRACECTRL_*` lines as they are — the defaults work for the workshop's local stack.
**Hit a Google AI Studio rate limit mid-workshop?** Swap `GOOGLE_MODEL_ID` to `gemini-2.5-flash` (also free-tier with generous headroom) and rerun.
**Don't commit `.env`.** Both examples gitignore it, but double-check before pushing any forks. Keys also land in TraceCtrl trace attributes — fine locally, something to know before pointing the OTLP endpoint anywhere remote.
**Sanity check:** from inside one of the example folders, run the runner script — it will install dependencies on first run and then immediately try to call the model. If your `.env` is right, you'll get an interactive `>` prompt. If auth is wrong, it'll error within a second. Either is fine for pre-workshop — the install + venv creation is what you want done ahead of time.
```bash theme={"dark"}
cd research_workflow_example
bash run_agents_workflow.sh # pip path
# or: bash run_agents_workflow_uv.sh # uv path
```
***
## Pull Docker Images Ahead of Time
**Do this before the session.** The images total \~1.4 GB — venue WiFi may be slow.
**Start your container runtime first.** Docker Desktop or Rancher Desktop must be running before any `docker pull` will work. On first launch, Rancher Desktop takes 2–3 minutes to provision its Linux VM — wait for the container icon in the bottom status bar to go green.
Sanity check:
```bash theme={"dark"}
docker info | head -5
```
If you see `Cannot connect to the Docker daemon`, the runtime is not up yet — open Rancher Desktop / Docker Desktop and wait.
```bash theme={"dark"}
docker pull ghcr.io/tracectrl/tracectrl-engine:latest
docker pull ghcr.io/tracectrl/tracectrl-ui:latest
docker pull clickhouse/clickhouse-server:latest
docker pull otel/opentelemetry-collector-contrib:latest
```
Or after cloning the repo (run from the repo root):
```bash theme={"dark"}
git clone https://github.com/tracectrl/tracectrl.git
cd tracectrl
make pull
```
**`make: *** No rule to make target 'pull'`?** You're either not in the repo root (`cd tracectrl` first), or your clone predates the `pull` target — run `git pull origin main` to update.
***
## Full Verification
Run this before the session. All five lines should show `✓`. The API key value itself is not checked — only that `GOOGLE_API_KEY` is set in your shell.
```bash theme={"dark"}
echo "=== TraceCtrl Bootcamp Prerequisites Check ==="
git --version >/dev/null 2>&1 \
&& echo "✓ Git: $(git --version)" \
|| echo "✗ Git MISSING"
python3 -c "import sys; assert sys.version_info >= (3,10)" 2>/dev/null \
&& echo "✓ Python: $(python3 --version)" \
|| echo "✗ Python MISSING or < 3.10 (found: $(python3 --version 2>/dev/null || echo 'not found'))"
docker info >/dev/null 2>&1 \
&& echo "✓ Docker: $(docker --version)" \
|| echo "✗ Docker daemon not running — start Rancher Desktop or Docker Desktop"
docker compose version >/dev/null 2>&1 \
&& echo "✓ Docker Compose: $(docker compose version)" \
|| echo "✗ Docker Compose v2 MISSING"
if [ -n "$GOOGLE_API_KEY" ]; then
echo "✓ Auth: GOOGLE_API_KEY set (Google AI Studio)"
else
echo "✗ Auth MISSING — set GOOGLE_API_KEY in your shell"
fi
echo "=============================================="
```
***
## Set Up TraceCtrl
With the prerequisites in place, install the TraceCtrl CLI and start the stack so it's ready to receive spans on day one of the bootcamp. By the end of this section you will have:
1. A running **TraceCtrl stack** (OTel Collector, ClickHouse, Engine, Dashboard)
2. The **tracectrl CLI** installed in a Python virtual environment
3. The Dashboard accessible at [http://localhost:3000](http://localhost:3000) — ready to receive spans from the agents you'll build during the workshop
### Clone and Install the CLI
```bash theme={"dark"}
git clone https://github.com/tracectrl/tracectrl.git
cd tracectrl
```
```bash theme={"dark"}
python3 -m venv .venv
source .venv/bin/activate
pip install tracectrl
```
```bash theme={"dark"}
uv venv
source .venv/bin/activate
uv pip install tracectrl
```
Requires [uv](https://docs.astral.sh/uv/getting-started/installation/) on `PATH`.
### Start the Stack
```bash theme={"dark"}
tracectrl setup
```
The interactive wizard starts the four Docker containers. Alternatively:
```bash theme={"dark"}
docker compose up -d
```
**Rancher Desktop users:** `tracectrl setup` detects Rancher automatically. If you're using the containerd engine, it uses `nerdctl compose` instead of `docker compose`.
**Memory:** Ensure your container runtime has at least 6 GB of memory allocated (Settings → Resources → Memory). ClickHouse is the heaviest container at 2–4 GB RAM.
### Verify the Stack
```bash theme={"dark"}
tracectrl doctor
```
Expected output:
```
TraceCtrl Doctor
Services:
[OK] Engine API (http://localhost:8000/api/v1/health)
[OK] Dashboard UI (http://localhost:3000)
[OK] OTel Collector (http://localhost:4318/v1/traces)
All checks passed.
```
Open the dashboard at [http://localhost:3000](http://localhost:3000) — currently empty. You'll populate it during the workshop.
**Checkpoint:** `tracectrl doctor` shows all green. Dashboard loads at `localhost:3000`. You're ready for the bootcamp.
The key starts with `AIza...`. The **Billing Tier** column shows **Free tier** — no payment is needed for the bootcamp.
### Step 2 — Test the Key
Paste this into your terminal (replace `YOUR_API_KEY_HERE`):
```bash theme={"dark"}
curl "https://generativelanguage.googleapis.com/v1beta/models/gemini-3.1-flash-lite-preview:generateContent" \
-H 'Content-Type: application/json' \
-H 'X-goog-api-key: YOUR_API_KEY_HERE' \
-X POST \
-d '{
"contents": [
{
"parts": [
{
"text": "What tools do you have access to?"
}
]
}
]
}'
```
Expected: a JSON response containing `candidates[0].content.parts[0].text`. If you see a `400` or `403` error, the key was not copied correctly — return to AI Studio and copy it again.
**Never commit your API key to git.** Always use environment variables — never paste the key directly into code files.
***
## Configure the Example `.env` Files
Each bootcamp example reads its config from a local `.env` file. Set them up once now — the workshop step is then just "run the script". Do this for **both** examples even if you only intend to run one; it costs nothing and saves time on the day.
```bash theme={"dark"}
cd tracectrl-bootcamp-examples
cp research_workflow_example/.env.example research_workflow_example/.env
cp teacher_assistants_workflow_example/.env.example teacher_assistants_workflow_example/.env
```
Open each `.env` and paste your `AIza...` Google AI Studio key into `GOOGLE_API_KEY`:
```env theme={"dark"}
GOOGLE_API_KEY=AIzaSy...your_key_here
GOOGLE_MODEL_ID=gemini-3.1-flash-lite
TRACECTRL_ENDPOINT=http://localhost:4317
TRACECTRL_SERVICE_NAME=agents-workflow
TRACECTRL_ENVIRONMENT=demo
```
Leave the `TRACECTRL_*` lines as they are — the defaults work for the workshop's local stack.
**Hit a Google AI Studio rate limit mid-workshop?** Swap `GOOGLE_MODEL_ID` to `gemini-2.5-flash` (also free-tier with generous headroom) and rerun.
**Don't commit `.env`.** Both examples gitignore it, but double-check before pushing any forks. Keys also land in TraceCtrl trace attributes — fine locally, something to know before pointing the OTLP endpoint anywhere remote.
**Sanity check:** from inside one of the example folders, run the runner script — it will install dependencies on first run and then immediately try to call the model. If your `.env` is right, you'll get an interactive `>` prompt. If auth is wrong, it'll error within a second. Either is fine for pre-workshop — the install + venv creation is what you want done ahead of time.
```bash theme={"dark"}
cd research_workflow_example
bash run_agents_workflow.sh # pip path
# or: bash run_agents_workflow_uv.sh # uv path
```
***
## Pull Docker Images Ahead of Time
**Do this before the session.** The images total \~1.4 GB — venue WiFi may be slow.
**Start your container runtime first.** Docker Desktop or Rancher Desktop must be running before any `docker pull` will work. On first launch, Rancher Desktop takes 2–3 minutes to provision its Linux VM — wait for the container icon in the bottom status bar to go green.
Sanity check:
```bash theme={"dark"}
docker info | head -5
```
If you see `Cannot connect to the Docker daemon`, the runtime is not up yet — open Rancher Desktop / Docker Desktop and wait.
```bash theme={"dark"}
docker pull ghcr.io/tracectrl/tracectrl-engine:latest
docker pull ghcr.io/tracectrl/tracectrl-ui:latest
docker pull clickhouse/clickhouse-server:latest
docker pull otel/opentelemetry-collector-contrib:latest
```
Or after cloning the repo (run from the repo root):
```bash theme={"dark"}
git clone https://github.com/tracectrl/tracectrl.git
cd tracectrl
make pull
```
**`make: *** No rule to make target 'pull'`?** You're either not in the repo root (`cd tracectrl` first), or your clone predates the `pull` target — run `git pull origin main` to update.
***
## Full Verification
Run this before the session. All five lines should show `✓`. The API key value itself is not checked — only that `GOOGLE_API_KEY` is set in your shell.
```bash theme={"dark"}
echo "=== TraceCtrl Bootcamp Prerequisites Check ==="
git --version >/dev/null 2>&1 \
&& echo "✓ Git: $(git --version)" \
|| echo "✗ Git MISSING"
python3 -c "import sys; assert sys.version_info >= (3,10)" 2>/dev/null \
&& echo "✓ Python: $(python3 --version)" \
|| echo "✗ Python MISSING or < 3.10 (found: $(python3 --version 2>/dev/null || echo 'not found'))"
docker info >/dev/null 2>&1 \
&& echo "✓ Docker: $(docker --version)" \
|| echo "✗ Docker daemon not running — start Rancher Desktop or Docker Desktop"
docker compose version >/dev/null 2>&1 \
&& echo "✓ Docker Compose: $(docker compose version)" \
|| echo "✗ Docker Compose v2 MISSING"
if [ -n "$GOOGLE_API_KEY" ]; then
echo "✓ Auth: GOOGLE_API_KEY set (Google AI Studio)"
else
echo "✗ Auth MISSING — set GOOGLE_API_KEY in your shell"
fi
echo "=============================================="
```
***
## Set Up TraceCtrl
With the prerequisites in place, install the TraceCtrl CLI and start the stack so it's ready to receive spans on day one of the bootcamp. By the end of this section you will have:
1. A running **TraceCtrl stack** (OTel Collector, ClickHouse, Engine, Dashboard)
2. The **tracectrl CLI** installed in a Python virtual environment
3. The Dashboard accessible at [http://localhost:3000](http://localhost:3000) — ready to receive spans from the agents you'll build during the workshop
### Clone and Install the CLI
```bash theme={"dark"}
git clone https://github.com/tracectrl/tracectrl.git
cd tracectrl
```
```bash theme={"dark"}
python3 -m venv .venv
source .venv/bin/activate
pip install tracectrl
```
```bash theme={"dark"}
uv venv
source .venv/bin/activate
uv pip install tracectrl
```
Requires [uv](https://docs.astral.sh/uv/getting-started/installation/) on `PATH`.
### Start the Stack
```bash theme={"dark"}
tracectrl setup
```
The interactive wizard starts the four Docker containers. Alternatively:
```bash theme={"dark"}
docker compose up -d
```
**Rancher Desktop users:** `tracectrl setup` detects Rancher automatically. If you're using the containerd engine, it uses `nerdctl compose` instead of `docker compose`.
**Memory:** Ensure your container runtime has at least 6 GB of memory allocated (Settings → Resources → Memory). ClickHouse is the heaviest container at 2–4 GB RAM.
### Verify the Stack
```bash theme={"dark"}
tracectrl doctor
```
Expected output:
```
TraceCtrl Doctor
Services:
[OK] Engine API (http://localhost:8000/api/v1/health)
[OK] Dashboard UI (http://localhost:3000)
[OK] OTel Collector (http://localhost:4318/v1/traces)
All checks passed.
```
Open the dashboard at [http://localhost:3000](http://localhost:3000) — currently empty. You'll populate it during the workshop.
**Checkpoint:** `tracectrl doctor` shows all green. Dashboard loads at `localhost:3000`. You're ready for the bootcamp.