Complete this before the bootcamp. Run the verification script at the bottom and confirm all green before arriving.
System Requirements
Hardware
Why is the memory bar so high?
Why is the memory bar so high?
The four Docker containers each have different resource profiles:
ClickHouse is the dominant cost — it is a production-grade OLAP database designed to hold millions of spans in memory for fast queries. On an 8 GB machine you have roughly 3–4 GB headroom after the full stack is running, which is sufficient for the workshop.
Software Prerequisites
1. Container Runtime
Pick the runtime that fits your machine and your organisation’s licensing policies. Docker Desktop is the simplest path on macOS / Windows if your org permits it. Rancher Desktop is a free open-source alternative if Docker Desktop’s subscription terms don’t fit (e.g., large enterprises on the paid tier). Docker Engine is for Linux servers and WSL2. All three work with TraceCtrl —tracectrl setup detects which is installed automatically.
- Docker Desktop (macOS)
- Rancher Desktop (free alternative)
- Docker Engine (Linux / EC2)
Docker Desktop
Simplest setup. Requires a paid subscription for large organisations — check your company’s policy first.
2. Python 3.10+
- macOS
- Ubuntu / Debian / WSL2
- EC2 (Amazon Linux 2023)
python3 --version → Python 3.10.x or higher
3. Git
- macOS
- Ubuntu / Debian / WSL2
- EC2 (Amazon Linux 2023)
git --version → git version 2.x.x
4. Bootcamp Examples Repo
Two pre-built, pre-instrumented Strands examples that the workshop uses. Clone now so the first run doesn’t have to download anything..env.example, runner scripts (run_agents_workflow.sh for pip, run_agents_workflow_uv.sh for uv), and Python files. Don’t cp .env.example .env yet — you’ll do that during the workshop once you’ve decided which auth path you’re using.
The first time you run a
run_*.sh script, it creates a venv and installs strands-agents[gemini], strands-agents-tools, tracectrl, and tracectrl-instrumentation-strands from PyPI. About a minute on pip, a few seconds on uv. Run the script once before the session to prime the venv — even if you don’t have an API key yet, the install will succeed and only the final agent call will fail. That gets the slow part out of the way over your home WiFi.API Key: Google AI Studio
The bootcamp organizer provides a shared Google AI Studio API key via a single Bitwarden Send link. You’ll need a passphrase to unlock it — the facilitator will share that on the day of the bootcamp.Get the Bootcamp API Key
Open Bitwarden Send → enter the passphrase (given in person on the day) → click the copy icon → paste straight into the
GOOGLE_API_KEY= line of each example’s .env.Free Tier Rate Limits
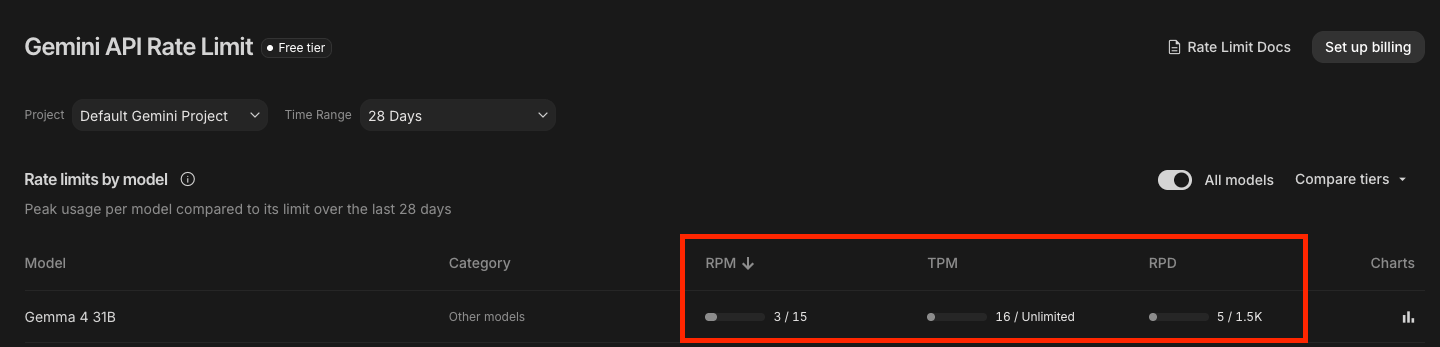
Free Tier Rate Limits
These limits are sufficient for the bootcamp. View your own limits anytime under Rate Limit in the AI Studio sidebar.
Step 1 — Create the Key
- Go to aistudio.google.com and sign in with any Google account
- Click Get API key in the left sidebar (or API Keys if already signed in)
- Click Create API key (top right)
- Select or accept the Default Gemini Project
- Your key appears in the list. Click the copy icon (highlighted below) to copy it to your clipboard
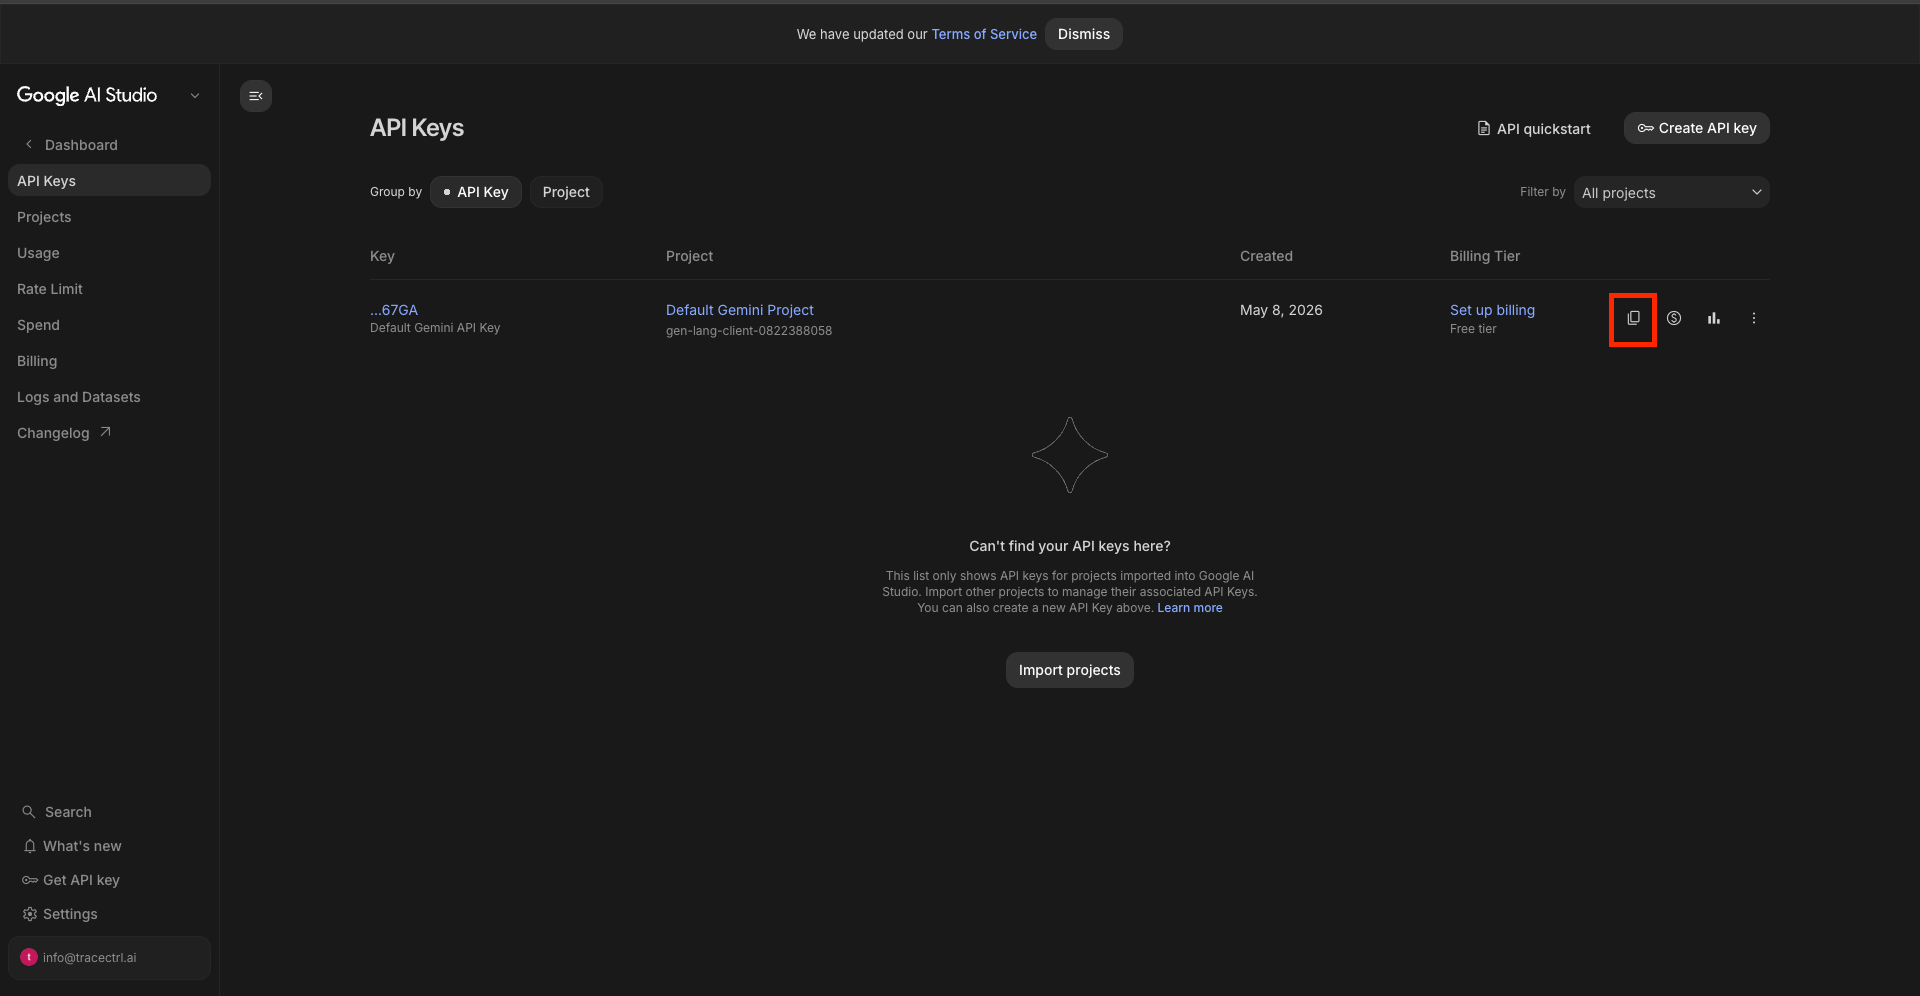
AIza.... The Billing Tier column shows Free tier — no payment is needed for the bootcamp.
Step 2 — Test the Key
Paste this into your terminal (replaceYOUR_API_KEY_HERE):
candidates[0].content.parts[0].text. If you see a 400 or 403 error, the key was not copied correctly — return to AI Studio and copy it again.
Configure the Example .env Files
Each bootcamp example reads its config from a local .env file. Set them up once now — the workshop step is then just “run the script”. Do this for both examples even if you only intend to run one; it costs nothing and saves time on the day.
.env and paste your AIza... Google AI Studio key into GOOGLE_API_KEY:
TRACECTRL_* lines as they are — the defaults work for the workshop’s local stack.
Hit a Google AI Studio rate limit mid-workshop? Swap
GOOGLE_MODEL_ID to gemini-2.5-flash (also free-tier with generous headroom) and rerun.Pull Docker Images Ahead of Time
Do this before the session. The images total ~1.4 GB — venue WiFi may be slow.make: *** No rule to make target 'pull'? You’re either not in the repo root (cd tracectrl first), or your clone predates the pull target — run git pull origin main to update.Full Verification
Run this before the session. All five lines should show✓. The API key value itself is not checked — only that GOOGLE_API_KEY is set in your shell.
Set Up TraceCtrl
With the prerequisites in place, install the TraceCtrl CLI and start the stack so it’s ready to receive spans on day one of the bootcamp. By the end of this section you will have:- A running TraceCtrl stack (OTel Collector, ClickHouse, Engine, Dashboard)
- The tracectrl CLI installed in a Python virtual environment
- The Dashboard accessible at http://localhost:3000 — ready to receive spans from the agents you’ll build during the workshop
Clone and Install the CLI
- pip (Python 3.10+)
- uv
Start the Stack
Verify the Stack
Checkpoint:
tracectrl doctor shows all green. Dashboard loads at localhost:3000. You’re ready for the bootcamp.